Tuesday, February 28, 2012

How to Photograph Sports Action

My favorite type of photography is sports. Even while growing up, I wanted to be the photographer on the sidelines capturing all the action. While in high school, I tried out my photography skills during summer football practice and was approached by one of the coaches fearful I was scouting for an opposing team. (I never tried that again.) I continued taking pictures of our son during his T-ball, baseball, and football seasons, but really got the hang of it in 2007 when I switched from film to digital. I love the instant gratification that comes with digital--knowing that you captured "the shot."


I’ve shot hundreds of thousands of sports photos. While I’m not the best, I’ve learned from some of the best, including pros who shoot college and professional sports, one of whom shoots for AP and covers the Olympics. They’ve all helped to hone my skills, so I think I’m ready for Sports Illustrated.

When I first started writing this article, I figured it would easy to explain, but it really isn’t. There are a lot of things that need to be considered when shooting sports. In order to make it a little more manageable, I’ve broken it down into two parts:

Monday, February 27, 2012

Part One - Preparation: Before the Action


 EQUIPMENT

Camera. If you’re new to photography and have little knowledge about manual settings, use your "sports" setting (usually an icon showing a runner) or shutter priority. The sports button makes it easy to capture your daughter’s first wack at the ball on a tee or your son’s first kick of the soccer ball. My first digital was a Nikon D50. Early on, I found that I got just as many good shots using "sports" mode as I did on manual. Sports mode tells the camera that it’s looking at action and works to stop that action. For the more seasoned and adventurous photographer, I’ll address manual settings further down.

Lenses.  Choosing the correct lens to be used during a sporting event is determined by two things: the lighting and the sport. Different sports require different lenses. Different lighting situations require different lenses.

Outside/Daytime. Field sports require reach. You need a lens that reaches at least 200mm. My absolute favorite lens for daytime sports is the Nikkor 70-300mm f/4.5-5.6. I use it for well-lit baseball, softball, football, and soccer games.

Indoor/Nighttime. Regardless of how good a photographer you think you are or how good you are at "tweeking" images in Photoshop, the 70-300mm f/4.5-5.6 will not work in low light situations. For this you’ll have to use a faster lens. My biggest lens investment for low light photography was a Nikkor 80-200mm f/2.8. I use it for nighttime baseball and football. It’s a pretty heavy lens, so it is married to my monopod during night games. For basketball, I use the lighter prime Nikkor 85mm f/1.8 (this is a perfect portrait lens too).

Memory/Compact Flash Cards.  The size of your memory card is a matter of taste. Some photographers prefer to use several 1GB or 2GB cards, switching them out throughout a game. Using multiple cards has its advantages, the biggest of which is the chance of losing more images should the card become defective. My personal preference is an 8GB ScanDisk Extreme IV Compact Flash which gives good speed and performance and generally enough memory to cover more than one game. Tip: Instead of deleting images, always format your card each time you use it. But make sure you format it using the camera and not your computer. This will help correct any disk errors that may have occurred during its last use.


CAMERA SETTINGS

Image Quality. I shoot everything in RAW, WITH THE EXCEPTION OF SPORTS. RAW tells the camera to collect a lot of data that can be manipulated more readily during post-processing, but RAW also clutters the camera’s processor. It slows it down. Shooting in JPG helps avoid processor or shutter lag, which can cause you to miss the shot.

Exposure Settings - ISO. ISO is the camera’s sensitivity to light. The higher the ISO, the higher the light, which is a good thing; but the higher the ISO, the grainer (more pixilation) the image quality too. It’s always a battle to get the right settings. My objective during any game is to keep the ISO as low as possible. If I’m shooting a day game, I try to begin with an ISO of 200 or 400. As the light fades or skies become cloudy, it’s necessary to increase the ISO. A nighttime or indoor game usually requires an ISO of 3200 (or higher). Tip: One wonderful secret I’ve learned is Auto ISO. Games are never static, they are constantly moving and changing, as is daylight. I’ve gotten into the habit of using Auto ISO during daytime sports especially because it allows automatic lighting adjustments as players run from shadows into sunshine. No photographer can make those adjustments when shooting a burst, but the camera can. Auto ISO allows the camera to adjust the ISO based on lighting conditions while maintaining a constant shutter speed/aperture combination. It’s great for sports photography.

Exposure Settings - Shutter Speed. The main concern in shooting sports is shutter speed. Your shutter has to be fast enough to stop the action. Shutter Speed is how long the camera shutter remains open to allow light onto the sensor. Rule to Remember: If your shutter speed is slower than the reciprocal of the focal length of your lens, you must use a tripod. For example, if you’re using a 300mm lens to photograph a landscape, your shutter speed must exceed 1/300 per second (it should be 1/320 or faster), if not, you should use a tripod. If your subject is moving (sports), you should double the shutter speed (1/600 or faster). If your subject is fast moving (boat or plane), you should triple the shutter speed (1/1000 or faster). You also need faster shutter speed to compensate for any camera shake. I generally triple my shutter speed to at least 1/1000 because we have some pretty fast players at Leroy and I move a lot.

Exposure Settings - Aperture.  Aperture refers to the size of the opening of the lens that the light must go through to reach the sensor. It is measured in f-stops. The numbers represent the ratio of the focal length of the lens to the diameter of the lens diaphragm opening. That's why it's called an focal number. The designation "f/2" means that the diameter of the aperture is 1/2 the focal length of the lens. The designation f/32 means that the diameter of the aperture is 1/32 the focal length of the lens. The aperture controls the depth of the image (f/2 will soften everything around the subject and f/32 will sharpen everything around the subject). Increasing aperture (lower f/stop) will decrease depth of field. Decreasing aperture (higher f/stop) will increase depth of field. I generally like using the lower f-stops (f/4 is a good) because it decreases the depth of field and gives that creamy background, isolating the subject, but a shallow depth of field is not always practical in sports. There’s a balance. For example, if I’m shooting a baseball game and focusing on the batter or pitcher, I want a smaller f-stop in order to keep the background unfocused and uncluttered, BUT, if the ball is hit to the outfield and I want to capture the rightfielder diving for it, I’m going to have to increase the f-stop (to at least f/6.3 or f/7.1) in order to have a deeper depth of field. That happens in an instant, so you better be ready to increase the f-stop by knowing your camera well enough to make a quick adjustment. This takes a lot of practice, but is well worth it when mastered.

Spot Metering. While I generally use Matrix Metering, there are times that I have to change to Spot Metering, especially if the players are dark skinned, wearing white jerseys. Spot metering the face will generally pull out the facial features from shadows, especially if the player is backlit.

White Balance. White balance is always tricky, but I’ve found that Auto works best 90 percent of the time. If you find your photos are too orange or blue, they are probably being influenced by the lighting. Try playing around with the Kelvin Scale. Sometimes it’s easy just to ask the videographer standing next to you what settings he/she is using.

Focus Adjustment - Release Mode.  Make sure your camera is set to continuous shutter. My Nikon has two continuous settings, CL (continuous low speed) and CH (continuous high speed). CH allows me to take up to 6 frames per second (fps), which number can be increased to 8 fps using a multi-power battery grip.

Focus Adjustment - Focus Mode. Make sure your focus mode is set to C (continuous servo AF), which focuses continuously while the shutter-release button is pressed halfway. If the subject moves, the camera will engage predictive focus tracking to predict the final distance to subject and adjust focus as necessary.

Focus Adjustment - Area Mode. When using Continuous Servo AF, I generally select 21 focus points and use Dynamic Area AF. If my subject briefly leaves one of the selected focus points, the camera will focus based on information from surrounding points.


Sunday, February 26, 2012

Part Two - Execution: During the Game

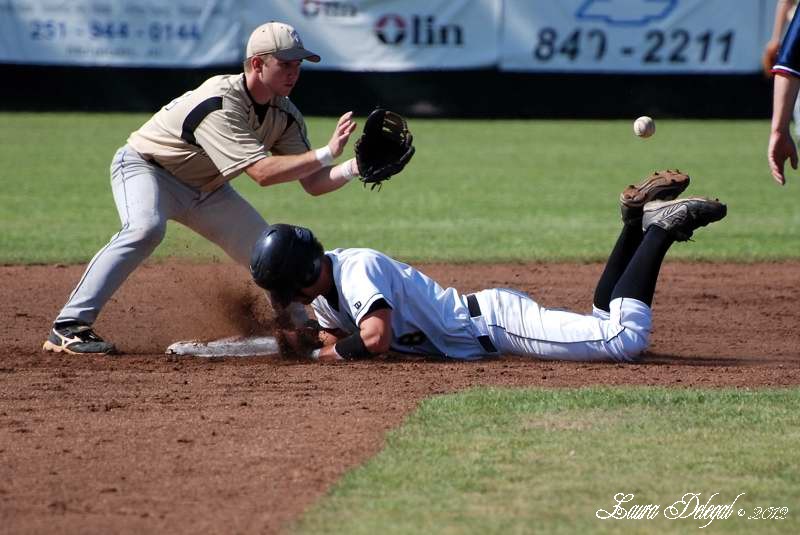
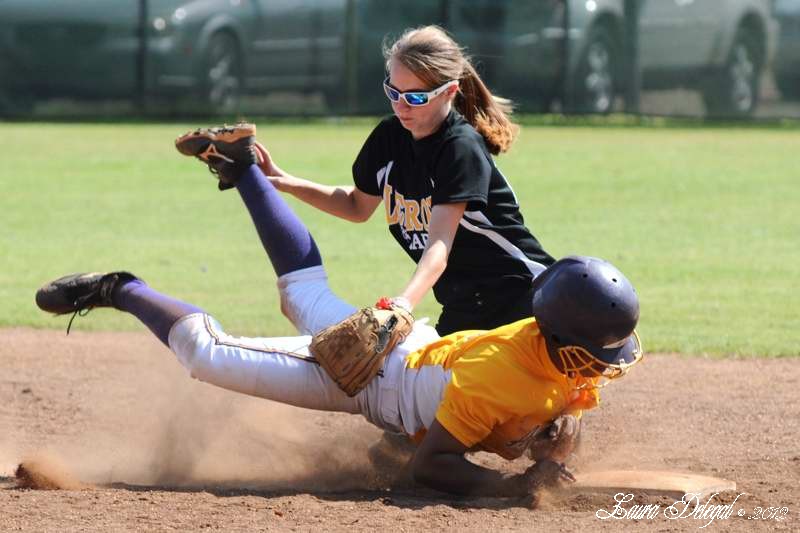
ANTICIPATION AND REACTION

Know Your Sport. Covering any sport requires anticipation and reaction. If you don’t know what’s going to happen, you don’t know how to react. If you don’t understand the game, then it’s hard to do either. Using baseball as an example: If there is a runner at first, you know that he will probably steal to second. You can either anticipate that the pitcher is going to try to throw the runner out at first or the runner is going to steal to second.


Know the Rules, Including Those Governing the Photographer. There are designated areas for photographers on the field and on the court. These areas are set aside to protect you and the players, but be mindful that these areas aren’t necessarily "safe." The longer you cover sports, the more likely you are to get hit, smacked, run over, and stepped on. I’ve been beaned with a baseball while in the photographer’s box and I’ve been plowed over by football players while in the "safety zone." Always be aware when the ball is in play and anticipate the action. There are some rules that come into play if the ball is hit into the box with the photographer. You can affect a softball game if you touch the ball or step out of the box, so always be aware. You don’t need a bunch of angry parents chasing you down after the game.


Be in the Right Location. Even the Sports Illustrated pros will tell you that they miss the action because they’re not in the right location. That is why you have to do everything you can to be at the right place and the right time and to have the right amount of luck. This isn’t always easy because players, coaches, referees/umpires, equipment, fences, and fans can block your view. I can’t tell you how many times I’ve wanted to tackle the referee ("zebra") or umpire because he/she stepped into and blocked that "perfect" shot. This calls for some creativity. If you’re blocked by a fence, get a small ladder or step stool to look over it or ask the coach if you can shoot from the dugout. If you don’t block anyone’s view, shoot from the backstop. Unless you have a very powerful lens, football can be the most challenging. With a 400mm or 600mm lens, you can station yourself in the endzone and never move, but, if you’re someone like me with a 200mm or 300mm, you’ll be trekking from one side of the team box to the other, trying to stay ahead of the action, so make sure you have your tennis shoes on.


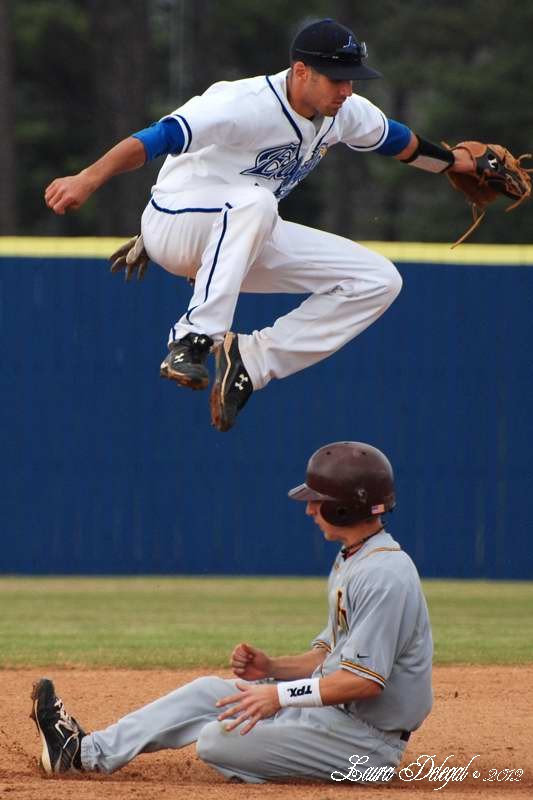
Anticipate and React. Players can sometimes give away their next move. A pitcher’s or quarterback’s eyes can reveal a lot, as can their body language. A subtle step from one side to anther by one of the infield players can tell where they anticipate the next play to be. If a runner is on third, the coach is going to do everything he/she can to get the player in to home. Watch for reaction too: the facial tics of the pitcher or the batter, the emotion of the coach or players after a good or bad play. With enough practice, you can learn to keep both eyes open, one to ensure you’re ready to take the shot and the other to watch other aspects the game.


EXECUTION

The Shot: The ideal sports photo shows action and includes the players eyes and the ball. Of course, you won’t always get the "ideal" photo, but that’s what you’re striving for. Don’t forget to get some wide-angle shots to capture your surroundings, including fans, cheerleaders, band members, players on the sidelines, or even sunsets or moonlight over the field.


Keep it Tight. It’s always good to shoot a balance of loose and tight shots. When in doubt, go loose because you can always crop. But the tight shots pull you in closer and capture details often missed with a looser shot.


Composition. Sometimes it is helpful to change your focus point in the viewfinder in anticipation of the action. For example, if the pitcher is throwing from right to left, move your focus point a few places to the right of center in order to capture his full follow-through. If football action is moving from left to right, move your focus point a few places to the left of center in order to more fully capture movement of the action. Tip: Since so many of us use medium format (DX) cameras, we need to optimize our shot. Instead of keeping the focus point in the center and having to crop out the empty space above a players head, move the focus point a spot above the center and keep it focused on the player’s face, not his/her chest.


Pre-Focus. If you know where the next play will be, pre-focus and wait. For example, if you know the next play will probably be a runner stealing to second, then pre-focus on second base and wait for the action. Tip: Instead of using the shutter release button to focus and shutter, use back button (AF-ON) to focus and the shutter release shoot a general area without having to refocus. This takes some practice, but makes a big different in tracking a moving object.


Check Your Settings. It’s always good to periodically check your settings to make sure they’re still good. The sun doesn’t stay in one place in the sky, so constant adjustments must be made. But don’t "chimp" by checking after every shot, especially when the ball is in play. You can always review them later. Be aware of the action and get out of the way.

Panning

Freezing (faster shutter, freezing the action) or Panning (slower shutter, following the action). To freeze the action, set your camera to sports mode or set your shutter speed priority to a high setting. Panning is a way to capture movement and have it expressed in your photos. To pan, slow down the shutter speed and follow the subject with your camera. That will isolate the subject, but give the feel of movement to the photo.

Backlighting
Backlighting. Let lighting conditions work to your advantage. While shooting with the sun against your back is great, it’s not an etched-in-stone rule that the sun must stay there. Some of my favorite photos were taken against a dark backdrop as the sun was setting, showing a wonderful outline of the player’s face or dust being kick up in the sunlight as a slide is made into second base. Good front light is also good backlight. They both give different perspectives.


Keep Shooting, Rain or Shine. Keep shooting even if it’s raining or snowing, but always make sure your equipment is protected. Camera storm jackets are inexpensive and easy to carry.


Be on the Lookout for "Moments".  Watch for the shots that tell a story outside the game.  Sometimes it's the simple comradery between players or fans, discussions between coaches and umpires, or just miscellaneous fun.


Avoid Using Flash. Flash is often strictly prohibited in college and professional sports because it can distract the players and make the coaches go crazy--and I don’t like crazy coaches. But there are some exceptions. In our area, flash is often used during indoor sports and football games. I don’t know how to use a flash, so that is never an issue with me. To be safe, check with the coaches or the school’s athletic director to ensure no one gets upset when the flashes start popping.

See Also Part One - Preparation:  Before the Action

Sunday, February 5, 2012

How to Make a Camera Strap Cover

My hubby, Dave, did his first year of refereeing high school football this fall.  He loved it!  It made me happy to see him happy, but I missed having him on the sideline.  We went in different directions on most Fridays and I didn't like that.  Now he has decided to try umpiring girls softball, which means going in separate directions again.  I usually cover baseball for some of the local newspapers, not softball.  That's made me think about streamlining what I carry to the ballpark since my sweet "pack mule" won't be there to help.  Most of the time I have pockets for business cards and lens caps, but sometimes I don't.  So, why not add pockets to my camera strap?

This is what I used to make my fabulous camera strap cover:

2 strips (23" long x 3-1/2" wide) of heavy fabric (for strap)
2 strips (4" long x 3-1/2" wide) of matching heavy fabric (for pockets)
2 strips (2" long) Velcro

My camera strap is the basic one that comes with Nikon cameras.  It measures 22-1/2" from edge to edge and is 1-1/2" wide.  I needed a pocket to accommodate my telephoto lens cap and business cards, so I decided the width should be 3".  First, I cut two strips of heavy fabric to 23" long and  3-1/2" wide and then I cut another two strips to 4" long by 3-1/2" wide.

Next I had to cut the corner on a diagonal, keeping a 1" open end.  Since I quilt, all my quilting supplies came in handy.  If you don't quilt, you can make a pattern from plain paper.

This is what you'll have.

Next, you'll need to turn the end edge 1/4" and hem.

Also put a 1/4" hem in one edge of the pocket and then sew the other end to the strap material.


I wanted the strap cover to be easy to remove, so I added Velcro to the center edge of one side.  I ran a 1/4" hem 5" along the center edge of each side.  If you don't want to add Velcro, you can hand-stitch the opening closed or add a snap of some sort.


Pin the two strap pieces together and sew one side from edge opening to edge opening.  On the opposite side, sew from the edge opening to midway to the already-hemmed Velcro opening.


Now trim the edges close to the seam.

Lastly, turn the material right-side out and press.  I used an interior fabric used for pillows or slip-covers, so I couldn't iron the fabric directly without melting it, so I covered it with a pillowcase and pressed with a steam iron.


So, there you have it, a camera strap cover with pockets for my business card and lens cap.  Nothing is ever perfect the first time, though.  I don't wear my strap around my neck.  It's too cumbersome and awkward.  I wrap it around my arm,which means the pockets hang in the wrong direction. :(

Which means I won't use it, BUT ... If anyone out there wants a nice camera strap cover--FREE!  Leave a comment and I'll have my FIRST (and probably ONLY) give-away.  It's in a wonderful tan/black suede-like material, making it ideal for both men and women.  I'll do a "drawing" next Saturday, February 11, 2012.

Come on now, leave me a comment.  You know you want this unique camera strap cover.  You'll be the envy of all your photog friends!

Tuesday, January 31, 2012

How to Photograph a Sunrise or Sunset

(c) Bill Goodloe - Taken 08/04/2008 at 7:52 p.m. with a Nikon CoolPix
Mobile Bay, Point Clear, Alabama

The emphasis of a sunrise or sunset is on the sky. Photographing it captures that moment when the sun says good morning or good night. Everyone enjoys a beautiful sunrise or sunset. But you don’t have to own a professional camera to capture one. Most point-and-shoot cameras have perfect presets. It’s as easy as setting it on landscape or sunset and pressing the button. But if you don’t have a P&S, here are some hints on how to photograph a sunrise or sunset using your digital SLR.

Before

Plan Ahead
I have to admit that I rarely plan ahead unless I’m on vacation. Most of the time I just happen upon a beautiful sunset, which is why one needs to know what to do should the opportunity presents itself. Be prepared.

Know the Sunrise/Sunset Time
Know what time the sun rises or sets and try to arrive at least an hour before. Remember, the hour before sunset or after sunrise is known as the "Golden Hour," which is when the strong light of the sun is defused and there is a warmer hue that surrounds everything it touches. Although the sun usually set within 30 minutes, the closer you are to the equator, the quicker the sun sets. Thirty minutes never seems to be enough time for me.

Scout Out a Good Location
If need be, ask the locals where to watch the sunset, they’ll certainly tell you where to go. Everyone in South Alabama knows that some of the prettiest sunsets aren’t taken on the beach in Gulf Shores (facing South), the most beautiful sunsets happen on the Eastern Shore of Mobile Bay (facing West). Those lucky few with homes along the boardwalk at Point Clear are often treated to glorious sunsets throughout the year.

Have the Right Equipment
  • Wide Angle Lens vs. Telephoto Lens. Many photographers insist on using a wide angle lens for sunsets because it give one an overall view of the landscape and sky. I agree, but I also like having a telephoto lens so I can zoom in on an interesting silhouette. Since I have two cameras, I keep the wide angle on one and the telephoto on the other. A telephoto lens can show the sun as a big disk and give it emphasis, but a wide angle lens can capture the gradient colors of a sunset.
  • Tripod and Shutter Release. Using a tripod allows you to shoot using a lower ISO and smaller aperture. A slower ISO, such as 100 or 200, reduces graininess, but also requires a longer shutter to capture the light. A smaller aperture, such as f/11, reduces the amount of light coming into the camera and also requires a longer shutter. You can understand then why having a tripod is a must when shooting at optimal settings.
  • Filters. Many photographers suggest using filters such as a polarizing filter, a ND (neutral density) filter, or a half/half ND filter in order to draw out the beautiful colors in a sunset. I haven’t made an investment in filters, so can’t really speak to that. They are definitely a must when shooting with a regular SLR using film, but one can get by without a filter when using a digital SLR because post-processing programs often allow filtering adjustments.
During

Camera Settings
  • RAW vs. JPG. I photograph everything, with the exception of sports, in RAW. RAW allows easier post processing and give me room to play around with the white balance. The WB is the greatest tool in shooting sunsets. It creates the hues and mood I desire. If you shoot in JPG, set your WB to "cloudy" in order to give it a warmer hue.
  • ISO. Try setting your camera to the lowest ISO (100 or 200).
  • Exposure. Some experts suggest shooting in aperture or priority mode. I don’t think either option is very good because the camera then makes adjustments to other settings in order to get a good exposure. That "good exposure" is what the camera wants and not what I want. In my humble opinion, manual is best. It allows me to be in control. You don’t want to overexpose the sun, you do want to emphasize it, which is why most suggest underexposure. Underexposure keeps the colors from being washed out and provides more contrast. To set proper exposure, try spot metering the sky above the sun and then adjusting your settings accordingly. Or, you can be lazy and simply set your camera’s built-in exposure compensation to a value of -1 or -2. Underexposing your shot will result in richer, deeper colors and shades of red, yellow, and orange.
  • Aperture. Remember that the lighting of a sunset will be strong initially, but fades as the sun sets. You will need to monitor and adjust your aperture throughout. Setting the aperture to the smallest possible will result in a deeper depth of field and ensure sharpness throughout the photo. It can also give the sun that starburst effect. If you’re able to use a tripod, try using a smaller aperture (like f/16) to begin with and then open it wider as the light fades.
Bracketing
Bracketing is often used by professional photographers to get the best exposure. Bracketing is a setting on most Digital SLRs. Check your manual. I often use bracketing when photographing sunsets. If your camera doesn’t allow it, or if you’d prefer to try manual bracketing, try exposing at f/8 (say, at 1/80); take the photograph and then take another after increasing the exposure by one stop (f/5.6 at 1/80); and then take another photo decreasing the exposure by one stop (f/11 at 1/80). Slightly lighter and darker versions bring out different elements.

Composition
Remember the Rule of Thirds which suggests that the subject or any major part of the image should be placed in one of the areas dividing the frame into thirds. Avoid placing the horizon directly in the middle of the frame, dividing it into equal halves. If you lower the horizon to the lower third, it will emphasize the sky; if you raise the horizon to the top third, it will emphasize what is below the sunset—water, ground, trees, streams, etc.

Focus
Unless you’re focused on a framed object such as a person, building, or tree, auto focus doesn’t always work. Sometimes it helps to focus on a dark cloud, but if that doesn’t work, try setting the camera to manual focus and setting the focus distance to infinity, otherwise your camera may not be able to lock focus and you will end up with a blurred picture.

Think Outside the Box
Sunset and sunrise photos don't have to be boring, same-old-same-old photos.  Spice it up.

Framing
The sunset, by itself, isn’t always interesting. Framing a sunset makes it interesting. Silhouettes add charm and can tell a story. Look for anything to frame the shot, such as boats, fishermen, or walkers on the beach.


Reflections
Rather than photographing a sunset headon, find something reflective, like a mirror, window, or puddle to capture pieces of it.


Long Exposure
If you’re using a tripod to photograph a sunset over the water, after the sun has set and the lighting is low, try using a longer exposure to make the water appear to have a smooth/misty surface.
Panoramas
If you can’t seem to capture the sunset’s vast beauty in one frame, try taking several photos from left to right and stitching them together into a panoramic view using an online program.

After

(c) Laura Delegal - Taken 08/04/2008 at 7:53 p.m. with a Nikon D80
Mobile Bay, Sunset Shores, Alabama

Stay Late
We were staying on the bay one summer, so I got ready for a beautiful sunset. I sat there with my camera on my tripod and waited, and waited, and waited. All I got was dark clouds. The sunset was a dud! I packed everything up and sat disappointed, whining to Dave. Suddenly, the sun dropped below the clouds and the horizon lit up. It was the most spectacular sunset I’d ever seen. So beautiful it was that the year-long residents came running to their balcony and yards to watch it, yelling up and down the beach, "Wow! That’s spectacular!  What a gorgeous sunset!" Remember there are always warm-up acts to the headliner.

Here are some photos from that "headliner" of a sunset over Mobile Bay.  Both were taken on the on the same day, at the same time.  The one on the left was taken by me from Sunset Shores, Alabama, and the one on the right was taken by my former boss from Point Clear, Alabama, which is located about10 miles due north of where I was.
Left taken by L. Delegal with Nikon D80.  Right taken by B. Goodloe with Nikon CookPix.
Both taken of the same sunset over Mobile Bay, on the same date, at the same time.

A sunrise or sunset, on a clear, cloudy, or foggy day, conveys hope for a fresh beginning. Clouds, whether thick or wispy or streaked with contrails, add drama to a sunset, just as dusty mornings add drama to sunrises. All are equally beautiful and worthy of being captured and enjoyed for years to come.

Follow-Up Note 02/14/12:

I’m thankful that there are many photographers in the blogosphere who willing to share their mastery of photography skills. Scott Law at Just Used Pixels is one of those giving individuals. He takes spectacular sunrise/sunset photographs, so I asked him to share or emphasize anything I overlooked. Here are his recommendations:
  • Polarizing Filter. A polarizing filter will cut about one stop on your light. If you are going to use a polarizing filter, make sure that you purchase a "circular polarizing filter" for digital work. Your dad’s old polarizer, even if it fits, will not work. A polarizer is more effective when it is aimed perpendicular to the direction of the sun or even opposite the sun. It is ineffective when pointed in the direction of the sun.
  • Graduated Neutral Density Filter. A half and half ND filter is also called a "graduated neutral density filter." It can be a wonderful help in darkening the sky and sun, but must be kept very clean and spot free. Scott says he has had wonderful sunset shots ruined by a dirty filter because the sun magnifies dust and water spots. "I very often shoot my sunsets with a neutral density filter so that I can get an intentionally long exposure and then by partially covering the top part of the lens for part of the time with a black non-reflective object, even a black-gloved hand, I can darken the sky and give the foreground some additional light. The best way to do this is to rock your hand back and forth while moving it up and down. It takes practice and, especially, the first few times, several exposures, but as you learn you’ll get quite proficient at it."
  • White Balance. Scott always shoots in RAW, but will often change his white balance from auto to shade. He finds it easier to process afterwards.
  • Subject and Composition. About 90 percent of Scott’s sunsets are taken over the water because he likes the reflection; "It’s like getting two for the price of one." In most of his sunset shots, he tries to have something of interest in the foreground, even if it’s just sand or rocks on the shore, because it adds interest to the photo and gives it depth.
Make sure you check out Scott's website:  http://scottlawphotography.com/ and click on "sunsets" to find a wonderful collection of sunsets.  Make sure you go back to last winter when ice was abundant and made some pretty spectacular photos.  Here are some samples of his work:

Thanks, Scott.

Reference:
World Through The Lens: Sunrise and Sunset Photography
Digital Photography School: How to Photograph a Sunrise
Digital Photography School: 12 Tips for Photographing Stunning Sunsets
Time and Date.com: Tips on Photographing Sunsets and Sunrises
Jeff Wignall: How to Photograph Better Sunset and Sunrise Photos
Nikon Blog: How to Photograph a Great Sunrise or Sunset
SLR Photography Blog: Tips for Photographing Sunrises
Photo Editing: Photography How to Shoot Sunset and Sunrise
Photopoly: Tips and Techniques to Photograph Sunset and Sunrise

Tuesday, January 24, 2012

How to Photograph Abandoned Places

I love abandoned homes and buildings. Photographing them is a great way to preserve history. I was recently looking back at some of the photos I've taken over the last two decades and realized that many of them have now collapsed or been torn down to make way for newer structures. You never know what treasures a photograph will be to future generations.

Photography Basics


Pay attention to framing. Show the entire house and it’s surroundings, just as you first saw it. Let your audience be drawn to the home like you were.

Capture the ambiance of the room by looking from within and without. Begin by looking through a door, through a window, or through a hole. Next look from within the room to the outside. Get a feel for the people who lived there and what they saw when they sat at the dining room table or on the front porch.

Focus details such as spider webs, discarded items, textures, rotten wood, peeling paint, or cracked plaster. There is always an interest in the hidden.

Take pictures from creative angles, low to the ground looking up, from a high vantage point looking down, or standing close to a wall looking up to the roof or molding

Preparation

The Boy Scout’s motto is "Be prepared." You would do well to be prepared too.

Before:
  • Try to find details about the structure and past owners. If you know the current owners of the property, contact them and ask permission to photograph the building. Most are happy to share the history of the place and give you tips on what to look for and the details you should notice. I usually go to the nearest home to ask if they might know information about the building. They’re usually a good resource.
  • Let someone know where you’re going. I always let my husband know where I am. If I don’t make it home, he knows where to start looking.
  • Always think about the weather and protection when choosing your clothing. Wear boots and clothes that will protect you from both the elements and debris. In urban settings, you may even want to wear a hard hat and dust mask.
During:
  • A flashlight, LED light, or even the light on your cell phone will aid in illuminating dark areas. A flashlight is also a creative source of light that can aid in bringing a photograph in a dark room to life. I don’t normally carry a flashlight, but usually have a book light in my camera bag.
  • A tripod will aid in getting good photos of the dark interiors of a building. You definitely need it for longer exposures on overcast days.
  • A wide-angle lens is a must. I currently use a 18-50mm f/2.8, which gives a good range to capture the overall setting of the home and a little bit of zoom to capture the smaller details.
  • Always make sure you have a cell phone. You never know what kind of trouble you might come upon. You wouldn’t want to be attacked by a vicious varmint (a/k/a spiders, bats, rats, snakes, rabid ‘coons, or other harmful animals) or fall into a hole or through a floor and not have a way to call for help. I recently explored an abandoned house located about a quarter mile from the road. As I was walking through the woods, alone, I realized it was still deer hunting season and I wasn’t wearing any hunter’s orange and could be mistaken for a beautiful doe. I started making a lot of noise, turning on my cell phone music and singing out loud. I’m sure I scared away the larger animals, but the smaller ones hunkered down and popped up as I approached the old home giving me a fright.
  • Always be aware of your surroundings. Watch out for holes, broken glass, rusty nails, dirty water, and leaning structures.  I was exploring an old building in the woods and found a very deep open well in the back. It was large enough that I saw it, but that’s not always the case.
After:
  • Always shower and change your clothes immediately upon your return home. Throw your clothes in the washer too. Ticks are a problem in our area and they are fast moving little critters. They’re a bad source of lime disease, so you don’t want them around. Also, some of the urban buildings can contain asbestos or other hazardous inhalants. Better to be safe than sorry.
Reference:
Digital Photography School: How to Photograph Abandoned Places
WikiHow: How to Photograph an Abandoned Building
Current Photographer: What Abandoned Places Can Teach You About Photography
Photography Minded: Abandoned Building Photography Preparation
Photography Minded: Shooting in Abandoned Buildings
Ghost Hunting Theories: Photographing Abandoned Places
My Modern Met: 25 Bone Chilling Photos of Abandoned Places
Photography Blogger: 30 Cool Abandoned House Pictures
Digital Photography School: 20 Beautiful Examples of Urban Decay Photography